How to make a digital escape room for the classroom
This blog post is from a Camp Engage: IMPACT! Session. Camp Engage is a free virtual professional development event for teachers looking for new ideas, resources, and content to support their teaching.
What is a digital escape room?
Physical escape rooms gained popularity in the mid-2010s as a group activity that challenged people to escape a locked room based on a set of themed clues. Shortly afterward, virtual escape rooms were developed to offer the same problem-solving and team-building opportunities to larger groups simultaneously without having to be physically locked in a room and invest in duplicates of all the locks. Teachers realized they could harness the engagement. They also figured out how to make a digital escape room with content-specific clues for a classroom. A virtual escape room, for fun or in a classroom, provides a challenging, immersive adventure that promotes problem-solving and collaboration.
What are the benefits of using digital escape rooms in the classroom?
Virtual escape rooms challenge students as they practice the real-world skills of critical thinking, teamwork, communication, and perseverance. Teachers who create a digital escape room experiences can customize it for any content or subject area and control the experience with age-appropriate visuals and clues. Digital escape rooms require reading to navigate, so they might not be accessible to young learners. The escape room can function as an introduction to a topic, an application of a unit, or a stand-alone team-building lesson. For easy access, incorporate tools familiar to students, for example, Google Forms for the digital “locks” or Nearpod activities for students to find clues. Learning the basics to design your own will give you a supply of free digital escape rooms for the classroom.
A teacher knows their own students and curriculum; they can balance predictable clues with more difficult ones. Video game designers combine difficulty levels so the players continue playing; even when they get stuck on a hard level, they find a motivational boost in the easier sections.
The same concept applies to an educational digital escape room. For me, each chapter has a list of key vocabulary words—some of the lock combinations come directly from that list. Students learn to look for predictable vocabulary words, so I mix in terms of people we discussed that aren’t on my key term list for more complexity.
How to make a digital escape room for the classroom
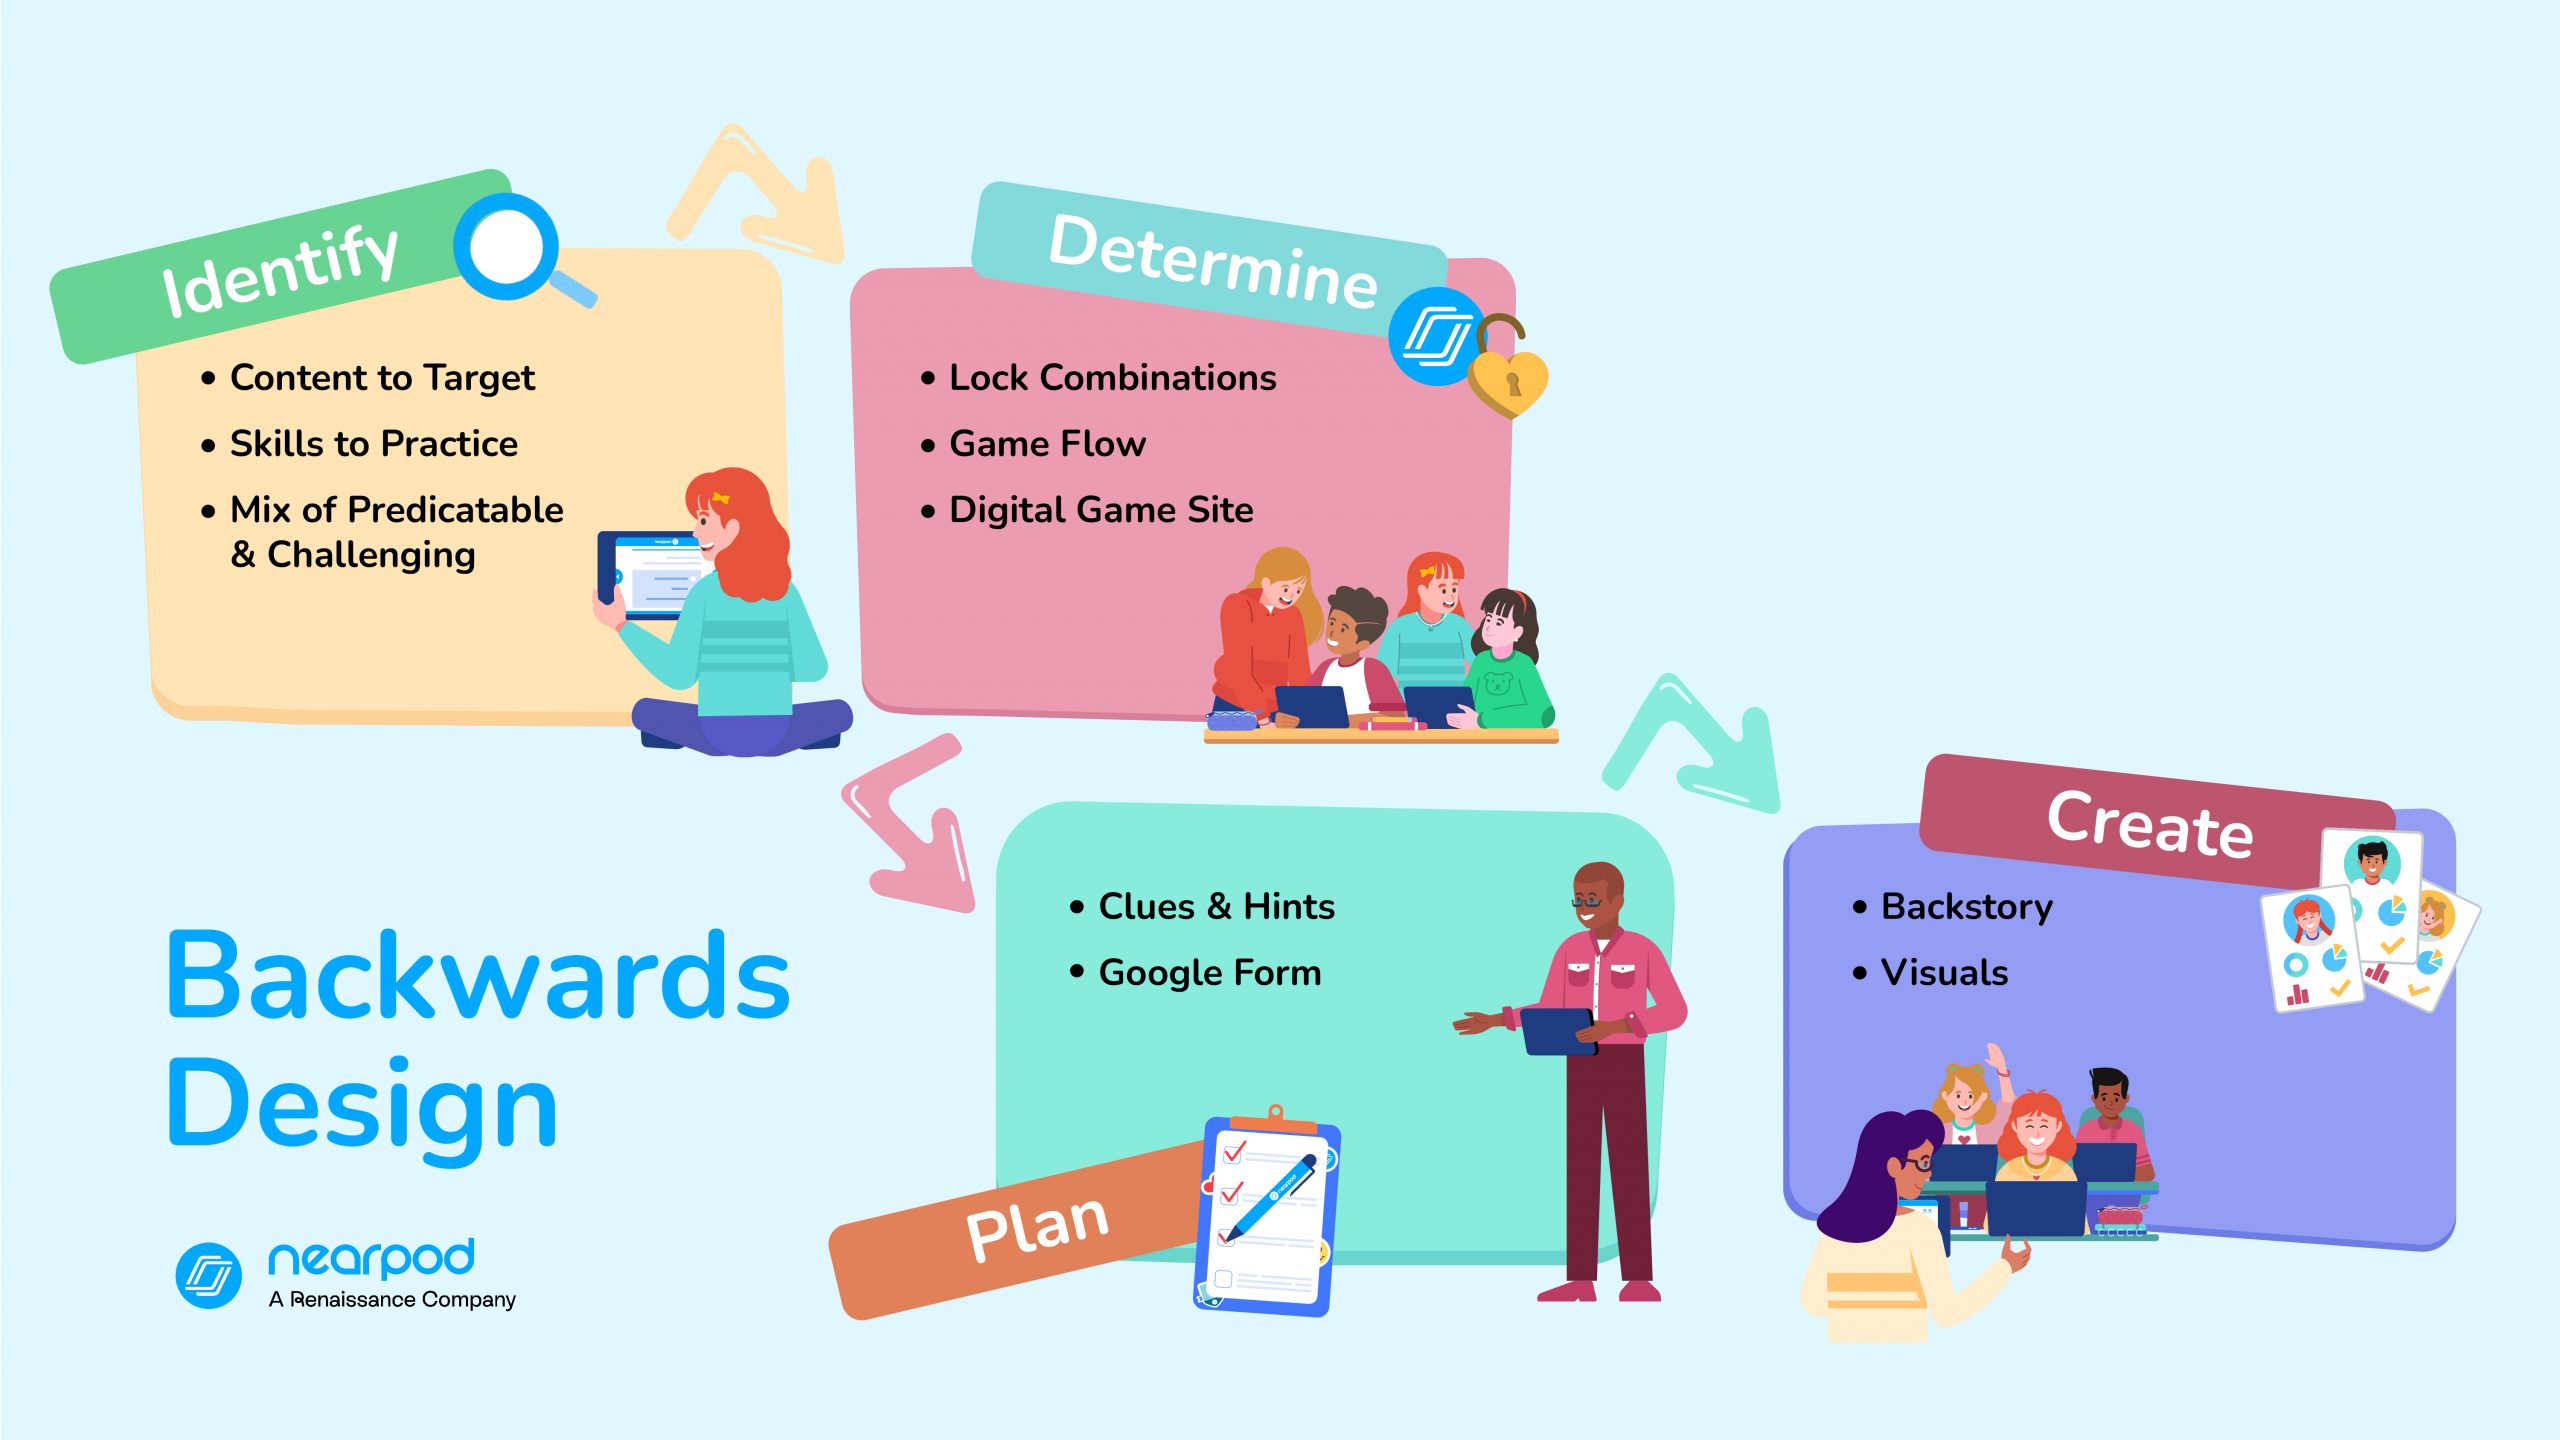
1. Use backward design to plan the escape room
Backward design is paramount. The process begins with setting the end goals. Teachers identify the content they want to target, which includes curriculum topics or skills for students to practice. After establishing the end goals, there are four additional parts:
- Determining logistics
- Creating clues and hints
- Visual design
- Writing the backstory
2. Choose the right tech tools for the logistics
Logistics for the virtual escape room include the following:
- A platform to host the clues
- The set up of digital locks
- The order in which students navigate through the online escape room
There are advantages to hosting the game on various platforms. Google Sites can contain hidden pages with random URLs. Google Drawings or a Google Slides presentation allows hotspots that link to other websites.
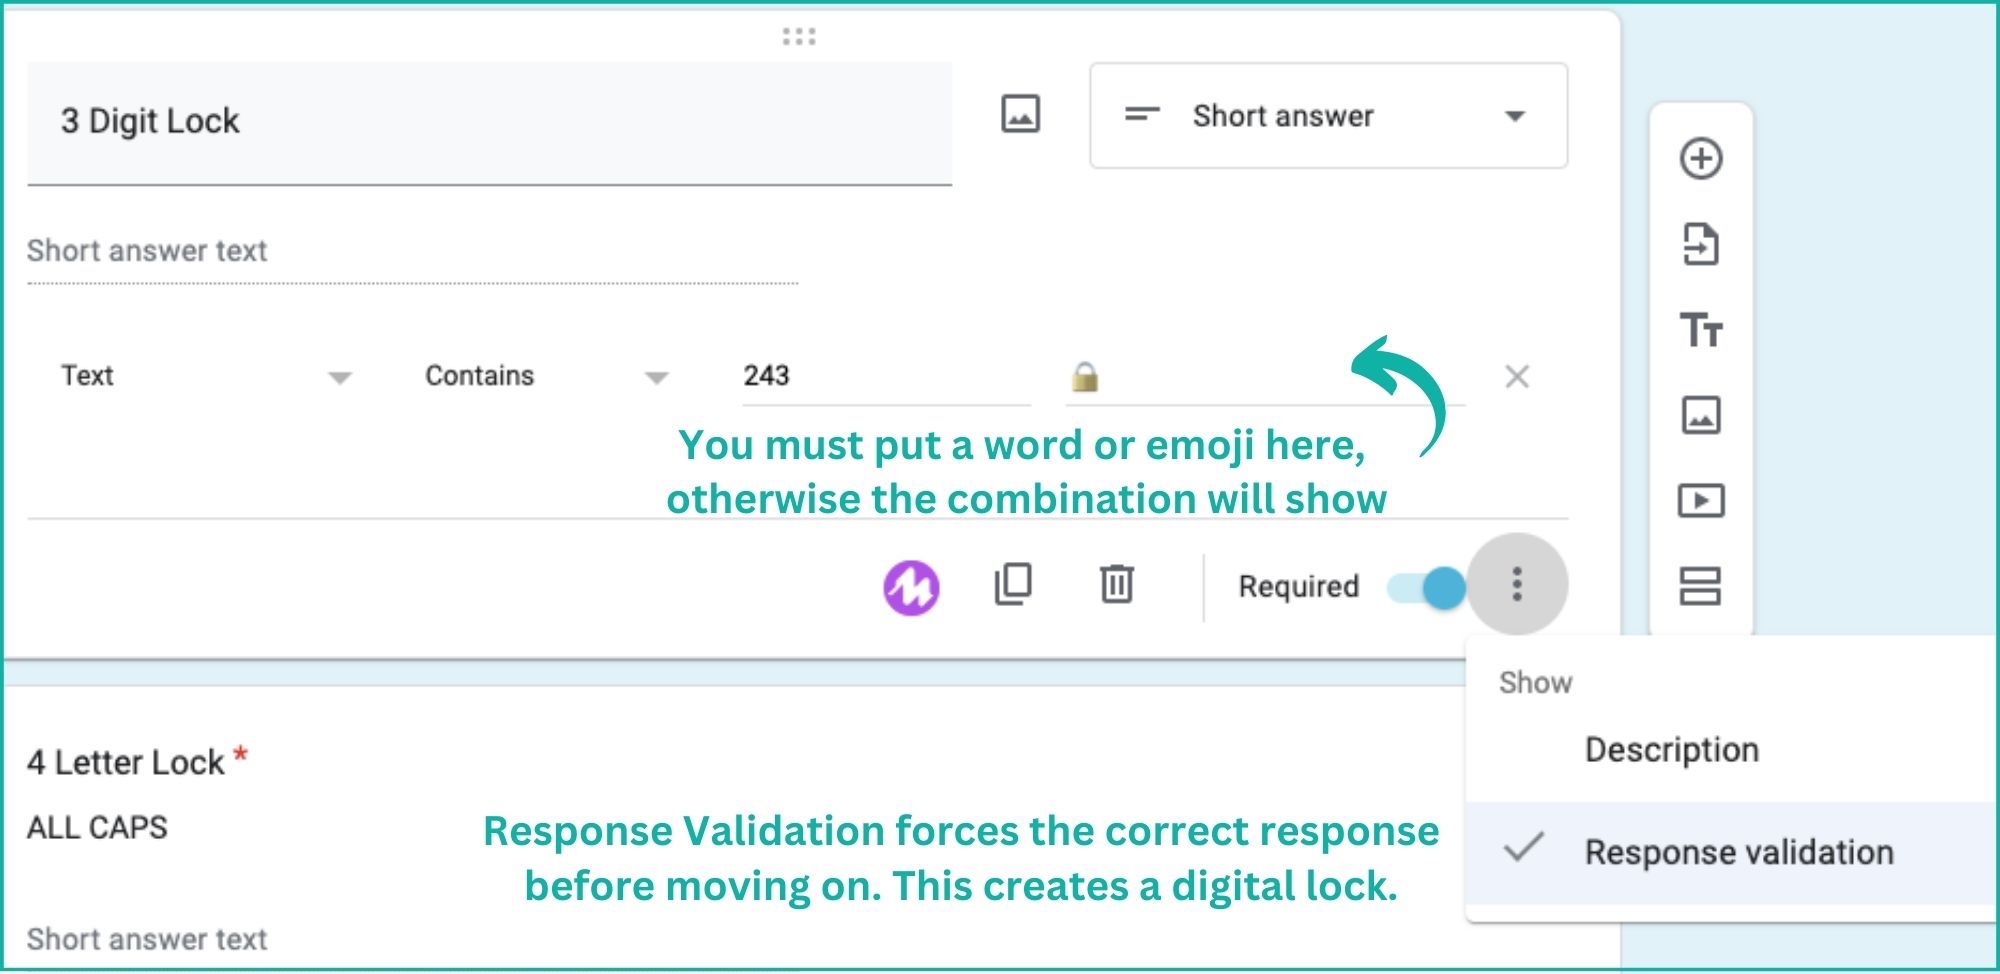
Nearpod activities function as clues, and you can embed outside resources. For digital locks, I use Google Forms because it allows response validation, custom error messages, and form requirements to solve puzzles before moving on. If you use Google Forms, learn from my first failure and include a custom error message. Unfortunately, if you do not, it will ruin the mystery and display the answer. If another resource offers response validation, that also works, especially if your students are already familiar with it. The error messages on the digital locks guide the learning process. It provides immediate feedback to the students, either letting them know they were correct, or offering a hint to adjust their thinking and fix mistakes. Have a general idea about the clues when setting up the logistics; the next step is actually creating them.
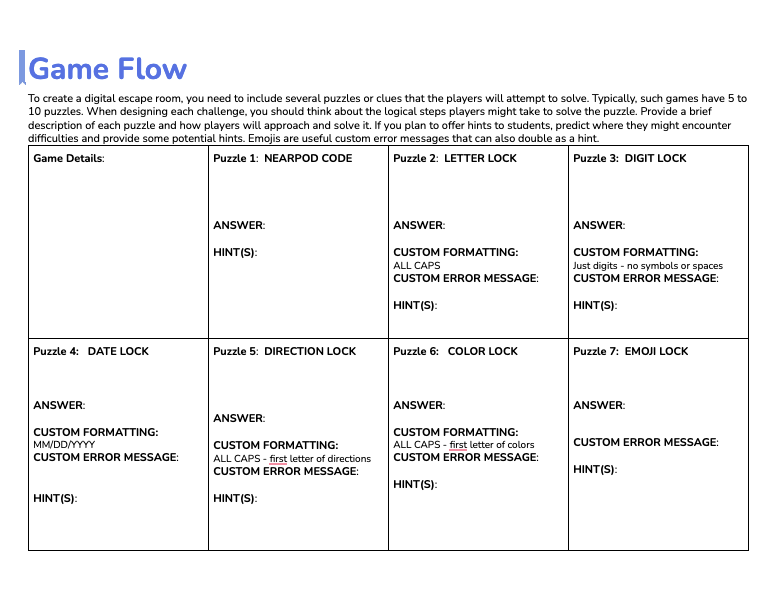
3. Create engaging clues, locks, and hints
Now for the fun part! A virtual escape room requires clues, locks, and hints. This part felt overwhelming when I began creating escape room games for the classroom, so it’s beneficial to have a digital escape room template.
The lock and clue possibilities are endless. Connect the locks to the content and skills you identified first. Here are some types of clues that easily adapt to any content escape room:
- Ciphers can include letters, numbers, emojis, or a more complex digital cipher
- Misspelled lists require students to fix intentional mistakes to find the hidden word within
- Photoshopped images with numbers or words camouflaged
- Math word problems can be customized to align with the skills students are learning in their math class
- Puzzles could be created digitally, or try cutting a QR code into pieces
- Fonts might be Redacted, DaFont Themes, Libre Barcode Font
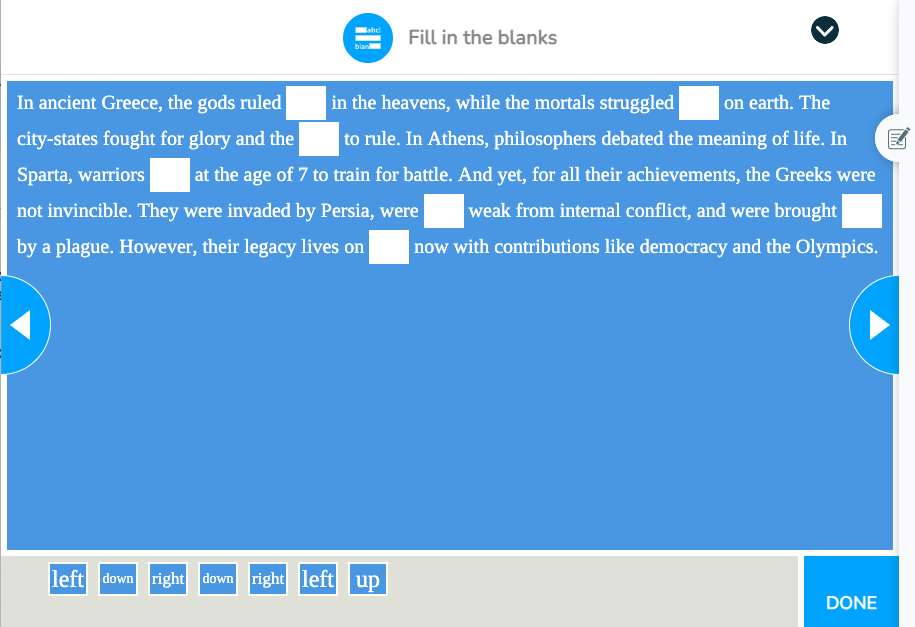
- Create a story using Nearpod’s Fill-in-the-Blanks
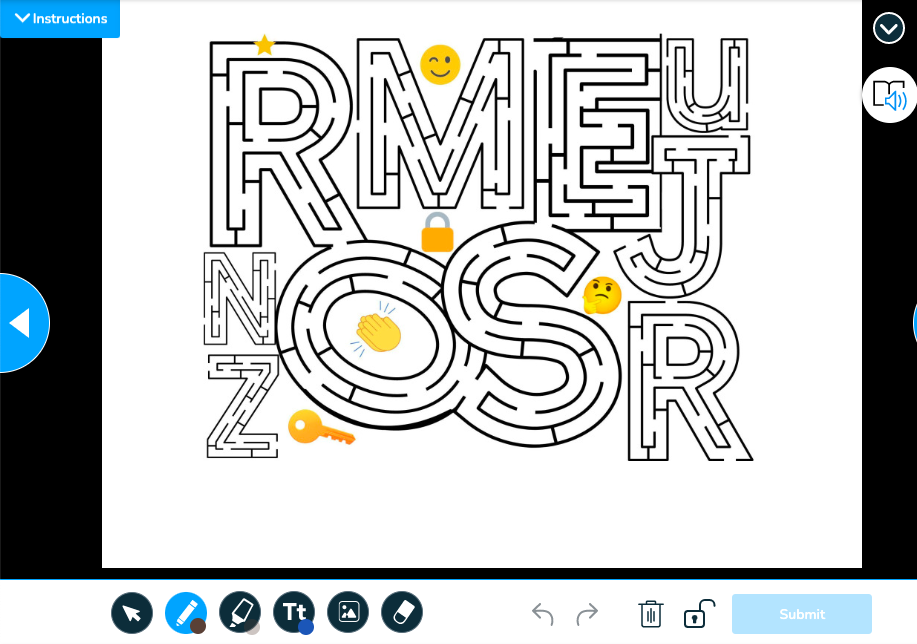
- Make a coordinate grid or a crossword to solve using Nearpod’s Draw It
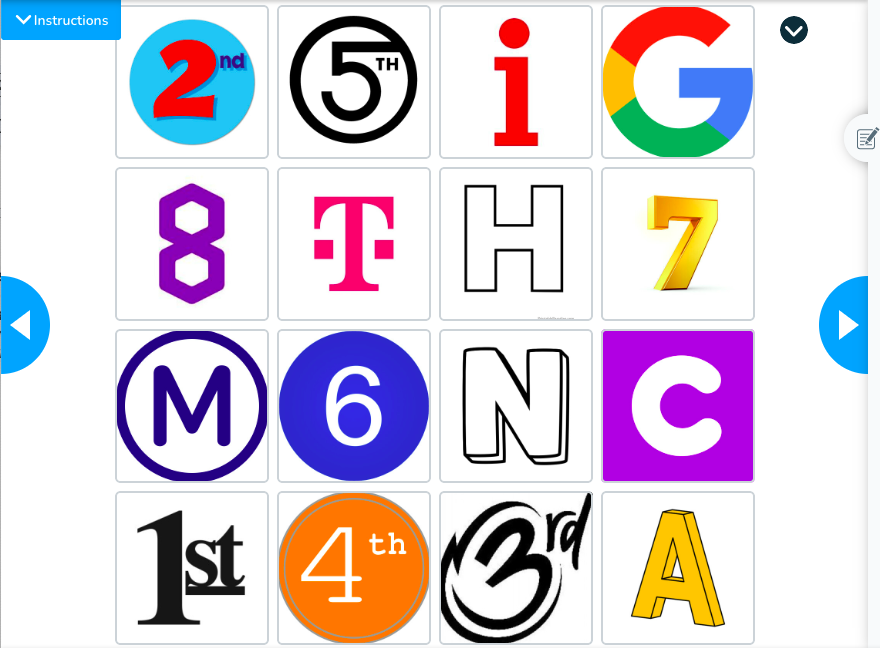
- Nearpod’s Matching Pair with ordinal numbers
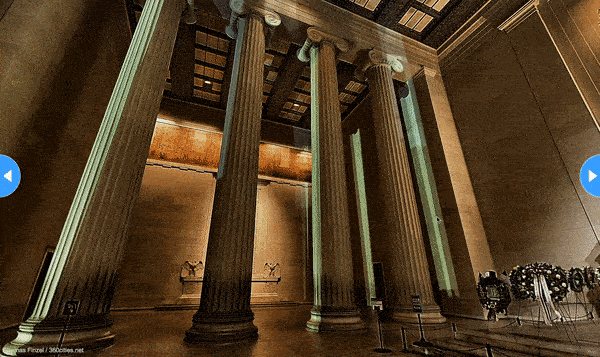
- Nearpod’s Virtual Reality (VR) Field Trip
The digital escape room template also includes a resource list with additional inspiration for locks and clues. The locks provide a chance to differentiate learning for different strengths: observation, logic, language, math, and humor.
4. Work on the visual design
Once you establish the lock combinations and the clues, it leads to the next step: visual design. This is crucial for a virtual escape room because it impacts the player’s experience and engagement.
You want multifaceted images to draw the players into the game and to provide clues to crack codes and locks; any image editing resource will work. I use Canva Education because I can create a set of images for each escape room, which I easily modify each year if necessary. Canva removes the background from images; transparent backgrounds work well for hot spot clues. All of these features are useful for designing graphics and clues. You can also utilize image design on each slide of either Google Slides or Nearpod. Consider how images tell the story.
5. Develop the backstory
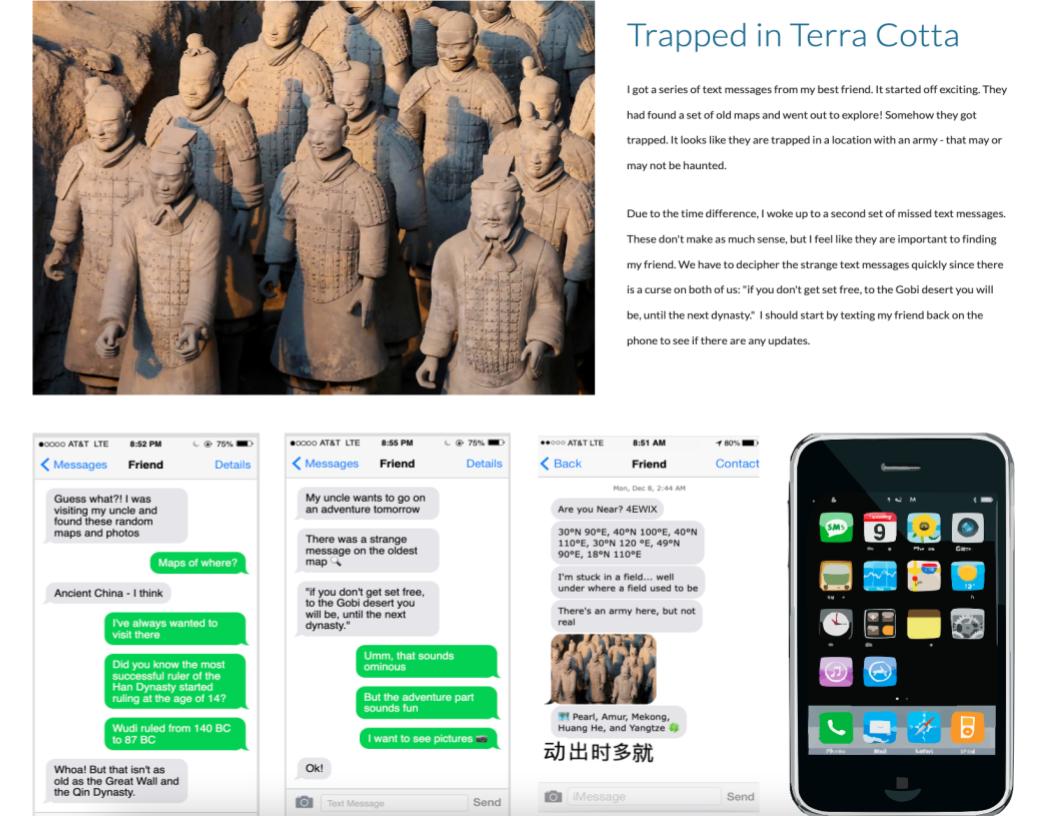
Online generators exist for fake text messages or fake newspapers, which work great for building a backstory. The backstory provides students with context and a framework for the escape room. Just like any story, you want to establish the setting, the characters, the goals, the potential obstacles the players will face, and the consequences of failure.
The backstory should motivate students and provide guidance on what to look for. I’ve used creative characters in a historical setting or realistic-fictional news story to weave the backstory. The first time I used an escape room I designed, the team worked together and were Googling if someone really did steal the Liberty Bell and abscond to Canada; that backstory had them hooked.
For my most recent classroom escape rooms, I have utilized ChatGPT for the draft of the backstory. I ask ChatGPT to generate a backstory that includes certain people, places, and any key vocabulary I want to include. You can also specify the audience and the desired length. The bot produces a solid start for an engaging story. I edit it slightly to align with the end goals of the escape room and provide a hint on where students should start looking for clues.
6. Combine all of these elements into the escape room
Backward design also involves going back to the beginning to combine the elements together. Think about the logistics you worked on earlier in the process.
Follow these steps to host an escape room on Nearpod:
- On a Nearpod slide, provide directions and the backstory for reference so student groups can go back and re-read if needed
- Embed the Google Form as Web Content to use for the locks—you can’t have an escape room without locks!
- Upload images on a slide to provide clues and hints
- Add interactive activities, like Fill in the Blank, VR Field Trip, and Draw It, as clues in the Nearpod presentation—you can even challenge students by requiring a cipher to unlock the Nearpod join code
Often I combine multiple resources together for the most challenging experience. My favorite combination includes Google Forms, Nearpod, Google Sites, and Google Drawings. Explore a sample lesson here.
Start designing your own virtual escape room for your students
Designing a virtual escape room takes time, but when I see how excited students are to participate in those lessons, it makes it worthwhile. The planning and design are foremost to the success of the escape room. There have been some mistakes and design struggles along the way, but I’ve preserved just like I expect students to do during an escape room lesson.
The design process has become easier with practice, and I find inspiration in everyday things I read or see. Sometimes a single image can spark an entire escape room, like a historical map or a unique font. I love witnessing the discussions and collaborations that occur, even if it looks like organized chaos in the classroom. Almost every time I start a new topic, my students will ask if there is an escape room at the end. The student enthusiasm and energy are my motivation to continue creating new virtual escape rooms.
Lisa is a middle school social studies teacher in Hershey, Pennsylvania. She’s passionate about experimenting with technology to enhance and excite students about learning. She also shares her joy with other educators through PD training.


